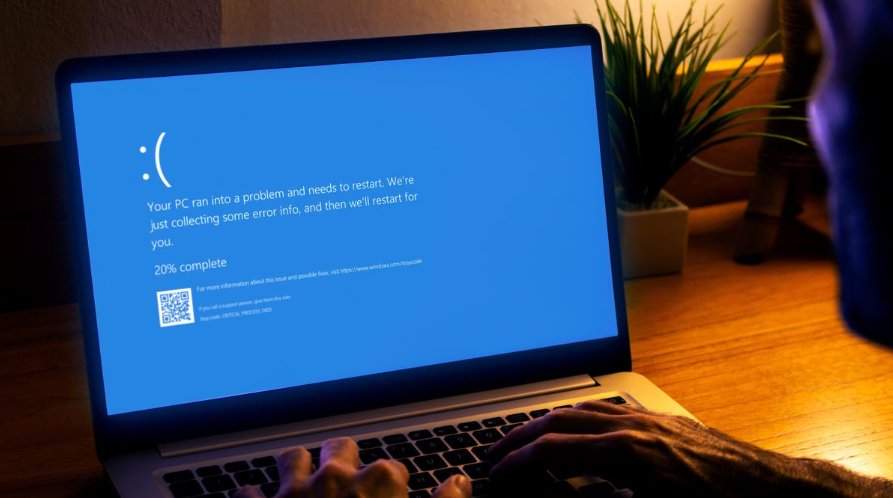
The Blue Screen of Death (BSOD) is a dreaded error screen that appears when something goes critically wrong with your PC. It’s usually caused by a hardware issue, a driver problem, or a system file error. When it happens, you’ll typically see a blue screen with white text that includes an error code and message explaining the issue.
BSODs often occur due to hardware failures, driver issues, or corrupted system files. Common causes include faulty RAM, incompatible drivers, overheating, or damaged system files. When this error shows up, it indicates a serious problem that requires immediate attention to prevent further damage or data loss.
What Causes the Blue Screen of Death?
A BSOD happens when Windows encounters a “STOP Error,” which causes it to crash and automatically restart. Unfortunately, during this process, any open data or unsaved work is lost because programs don’t have the opportunity to save before the restart.
While hardware failures and faulty drivers are the most common culprits behind BSODs, low-level software running in the Windows kernel can sometimes also trigger the error. Regular applications don’t typically cause BSODs, as they don’t affect the operating system itself.
Depending on your version of Windows, the BSOD screen will look different. In Windows 10 and 11, it displays a sad-face emoji and a message saying, “Your PC ran into a problem and needs to restart. We’re just collecting some error info, and then we’ll restart for you.” Older versions, like Windows 7, show more detailed information, including a message like “A problem has been detected and Windows has been shut down to prevent damage to your computer.”
How to Prevent Windows from Restarting Automatically
When a BSOD occurs, your PC will typically restart on its own, which can be frustrating if you want to read the error message. You can change this setting to give yourself more time to analyze the issue.
For Windows 8 and 10, follow these steps:
- Right-click on Computer and select Properties.
- Click on the Advanced tab, then select Settings under Startup and Recovery.
- Uncheck Automatically restart under System failure.
Now, when you encounter a BSOD, you’ll have time to write down the error message, but you’ll need to restart your PC manually.
Troubleshooting the Blue Screen of Death
To troubleshoot a BSOD, follow these steps:
- Open the Control Panel.
- Click on Security and Maintenance (or System and Security for Windows 7).
- Click Check for solutions.
Windows 10 and 11 will often run automatic troubleshooting after a restart, but it’s a good idea to check manually for more detailed information or additional steps.
Another effective troubleshooting method is to search for the specific error message you see on the BSOD. Write down the STOP Error code (e.g., 0x0000000E) or error message (e.g., NO_USER_MODE_CONTEXT) and perform an online search. You can find solutions specific to that error code.
Additional Fixes for BSODs
If Windows can’t fix the issue on its own, try the following fixes:
- System Restore: Restoring your system to an earlier version may solve the issue if it’s caused by software problems.
- Scan for Malware: Run a malware scan to ensure that malicious software isn’t causing the crash.
- Install Updated Drivers: Download and install the latest drivers for your hardware, as outdated drivers can lead to BSODs.
- Boot into Safe Mode: Safe Mode loads only essential drivers, which can help you identify if a specific driver is causing the problem.
- Check for Hardware Issues: Test your computer’s memory for errors and check its temperature to prevent overheating. If necessary, test other hardware components or seek professional help.
- Restore BIOS to Default Settings: An overclocked or misconfigured BIOS can cause BSODs. Resetting it to default settings may resolve the issue.
Recovering Data After a BSOD
The Blue Screen of Death itself doesn’t directly delete data, but it can make it difficult to access files if the error is caused by system or hardware issues. Before you attempt to fix the BSOD, it’s important to recover your data.
You can use professional data recovery software like EaseUS Data Recovery Wizard to retrieve files from your HDD, SSD, USB drives, or other devices affected by crashes, virus attacks, or damaged files.
Method 1: Recover Data Using Another PC
- Remove the hard drive from the malfunctioning PC and connect it to a working one as a secondary drive.
- Install EaseUS Data Recovery Wizard on the new PC.
- Open the software, select the drive where the data was lost, and click Search for Lost Data.
- After the scan, use the “Filter” or “Search” option to locate the lost files.
- Select the files you want to recover and click Recover. Save them to a safe location.
If you don’t want to remove the hard drive, you can use EaseUS Data Recovery Wizard directly on your malfunctioning PC using bootable media.
Method 2: Recover Data Using a USB Drive
- Plug a USB drive into your PC.
- Type “reset this PC” in the Start menu and go to Advanced options.
- Open Command Prompt and type
start notepad. - Once Notepad opens, click Save As to open the file explorer.
- Copy and paste your important files onto the USB drive.
Conclusion
While dealing with a Blue Screen of Death can be stressful, there are ways to recover your data and resolve the issue. Following the troubleshooting steps outlined above can help you fix the BSOD and recover your files using tools like EaseUS Data Recovery Wizard. Always take care when attempting repairs or data recovery, and if you’re unsure, consider consulting a professional to avoid causing further damage to your system.


